1 Software
1.1 Reference Distribution
The Reference Distribution is based on Ubuntu 12.04 LTS and contains some custom packages and scripts to help you install the head software.
1.1.1 Preconditions
This chapter assumes you have already aquired a copy of the Reference Distribution.
1.1.2 Installation
Burn the ISO image to DVD or write it to a USB-Stick using the usb-creator utility that comes with Ubuntu.
Insert the installing medium into the PC and install Ubuntu like you would normally do.
1.1.3 CAN Setup
Since Ubuntu overwrites the /etc/network/interfaces file on installation you need to run sudo /opt/setup_can.sh.
1.2 MCA
To control the Karlsruhe Humanoid Head a modified version of the software MCA 2.4 is used.
1.2.1 Preconditions
This section assumes that you are running Reference Distribution.
1.2.2 Installation
You can install a patched version of MCA 2.4 from our repository.
Using the user name and password of your account clone the repository:
git clone https://i61wiki.itec.uka.de/git/mca.git mca2.41.2.3 Compilation
 ~ > cd mca2.4
 ~/mca2.4 > source script/mcasetenv
 ~/mca2.4 > speedscons --fillcache with_newmat='/usr/include/newmat/' \
                        with_socket_can_driver='/usr/include/'
Different configuration options:
On systems without can drivers omit
with_socket_can_driverWith ITEC-Can driver: use the option
with_itec_can_driver = '/usr/include/can-itec'instead.
For a full list of options run: scons --help
Note: Setting provided to scons are cached in .mca2-config and do not need to be specified on the next run of speedscons.
1.2.4 Tools
1.2.4.1 mcagui
The mcagui provides common graphical user interface in order to establish a connection to the control part of the head via TCP/IP. Whenever a user changes an actor value, it is sent via TCP/IP to the MCA2 system, e.g. values are only sent if necessary. As mcagui may not guess whenever sensor values may change, these values are polled frequently. For controller input the mcagui contains various control widgets as buttons, sliders etc., while there are status widgets like LCDs or LEDs for displaying sensor values. These allow the user to create a customized GUI. After creating a widget, according to the users intention, one has to assign the widget to an input value (aka actor value) or sensor value. For simulation purposes, it is possible to integrate a 3D model of the head for the visualization. Similar to the widget, the model parameters have to be assigned to the sensor values. After customizing a GUI, for later use, it needs to be saved in a file with the extension .mcagui. For mcagui examples, please have a look in the projects/head/etc/gui directory.
 ~ > cd mca2.4
 mca2.4 > source script/mcasetenv
 mca2.4 > mcagui /path/to/sampleGUI/sampleGUI.mcagui
1.2.4.2 mcabrowser
The mcabrowser is a very useful tool for modifying head parameters and for testing controller inputs. Different parameter settings and input values can easily be tested and compared without recompiling or restarting of the system. The complete controller architecture is therefore read and graphically displayed in a tree-like structure. The user can navigate through the hierarchy with only a few mouse-clicks, select certain modules and act on its parameters. The below picture shows a screenshot of one module group displayed by the mcabrowser tool. Beside the graphical representation of the executed program mcabrowser enables the user to manipulate all IO and Parameters of all Modules and even prevent single or all modules from their execution. Moreover profiling information (How much cpu time is spent for the execution) about the modules and groups can be shown.
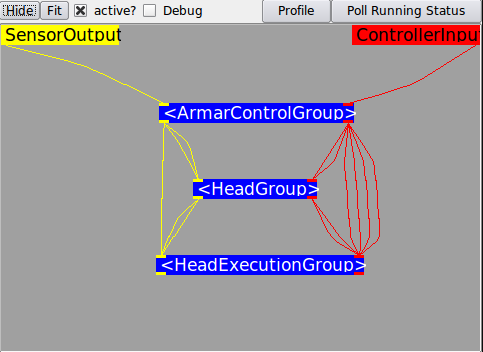
MCABrowser showing the Head Modules
However, changing parameters on the low-level layer might cause severe damage to the system. Hence, you should be extremely careful and know what you are doing.
1.3 Integrating Vision Toolkit (IVT)
1.3.1 About
The IVT is used in the head project for all vision tasks as e.g.:
Capturing of images from foveal and perspective cameras
Camera image undistortion and rectification
Stereo vision
Object tracking
IVT is optional. The head project can be used without IVT by specifying the flag:
vision=noin the file: ${MCA2_HOME}/projects/armar3/robot_interface/config
1.3.2 Installation
1.3.2.1 For external users
Download IVT from SourceForge and uncompress the archive to a folder named IVT on the same level as mca2.4.
Follow the instructions to setup and compile IVT.
Important:
in IVT/src/Makefile.base make sure to set the flags
USE_OPENCV = 1,USE_QT = 1andUSE_QTGUI = 1to use the foveal cameras make sure you set the flags
LIBDC1394_V2 = 1andLIBDC1394 = 0make sure the flag
visionin${MCA2_HOME}/projects/armar3/robot_interface/configis set toyes(see HeadProjectConfiguration)
1.3.2.2 For IAIM users
Download IVT from the following repository using your Redmine-Account name and password:
git clone https://i61wiki.itec.uka.de/git/ivt.git IVTExecute the following commands to compile IVT.
 ~/IVT > mkdir build
 ~/IVT > cd build
 ~/IVT/build > cmake -DIVT_GUI_USE_QT3=1 ..
 ~/IVT/build > make
If you get an build error, it might be the wrong version of moc is used. Open CMakeCache.txt and search for moc-qt4. If you find anything replace it with moc-qt3.
1.4 Head Project
1.4.1 Preconditions
This section assumes that you are running Reference Distribution.
Furthermore MCA2.4 has to be installed prior to installation of the head project.
If you want to use internal vision, also IVT has to be installed.
1.4.2 Fetching sources
Using the user name and password of your account check out our repository:
 ~ > cd mca2.4
 ~/mca2.4 > mkdir projects
 ~/mca2.4 > git clone https://i61wiki.itec.uka.de/git/karlsruhe_head.git projects/armar3
Important: Since scons doesn’t seem to follow symbolic links, you really need to clone the head project to projects/armar3.
1.4.3 Configuration
The default settings will compile the Head Project without internal vision and foveal cameras. To change this edit the file:
${MCA2_HOME}/projects/armar3/robot_interface/configIn the default version it contains the following settings:
[armar_control_part]
vision = no
use_foveal_camera = no
speech = no
1.4.4 Compilation
To configure your copy of the Head Project do the following:
 ~ > cd mca2.4
 ~/mca2.4 > source script/mcasetenv -p armar3
 ~/mca2.4 > speedscons --fillcache with_socket_can_driver='/usr/include' \
    with_newmat='/usr/include/newmat' \
    with_ivt='/home/SMBAD/<username>/IVT'
    project=armar3
If you did not disable the vision system, you can omit the with_ivt
Note: Setting provided to scons are cached in .mca2-config