2 Calibration
2.1 Camera calibration
2.1.1 Preconditions
This section assumes that you have correctly installed and configured MCA and IVT on your Reference Distribution.
2.1.2 Camera UUID configuration
First the UUIDS of the cameras need to be specified. For this purpose connect the Firewire cable of the head. Since the cameras use the power supplied by the Firewire cable, you don't need to turn on the head.
To extract the UUIDs (and to the lense calibration) you can use the application CaptureAllApp.
 ~ > git clone https://i61wiki.itec.uka.de/git/ivt.projects.git IVTProjects
 ~ > cd IVTProjects
 ~/IVTProjects > cd CaptureAllApp
 ~/IVTProjects/CaptureAllApp > mkdir build
 ~/IVTProjects/CaptureAllApp > cd build
 ~/IVTProjects/CaptureAllApp > cmake ..
 ~/IVTProjects/CaptureAllApp > ./captureapp --list-cameras
The UUIDs are printed as hex numbers in the console output when starting the application.
You can identify the peripheral pair, by comparing field of sight of two cameras. (usually the upper two cameras)
When you have determent which UUID belongs to which camera, you need to write the UUID in the oder:
HEADNAME_top peripheral UUID_LEFT UUID_RIGHT DRAGONFLY_VERSION X_RES Y_RES FPS
HEADNAME_bottom foveal  UUID_LEFT UUID_RIGHT DRAGONFLY_VERSION X_RES Y_RES FPS
Example:
ka_head_11_top peripheral 00B09D01009A72EC 00B09D01009A72D3 2 640 480 30
ka_head_11_bottom foveal  00B09D01009A72DF 00B09D01009B56FC 2 480 320 15
into the file: mca2.4/projects/armar3/robot_interface/files/camera_uids.txt
2.1.3 Calibrate lens focus
Each camera has a tiny black screws that fixates the camera lens. To calibrate the lens focus, you need to loosen this screws.
You can use the CaptureApp as above to test the focus.
For the peripheral lenses with a , use a focus point of about 50cm to infinity.
For the foveal lenses use a focus point of about 70cm.
2.1.4 Calibrate stereo vision
Start the head. and reset position.
(in the same console because of the environment variables)
~/mca2.4 > mcagui projects/armar3/etc/gui/HEAD_GUI.mcaguiSelect All joints to zero.
Then go to the IVT directory. Build and launch the application “CalibrationApp”.
 ~ > cd IVT
 ~/IVT > cd examples/CalibrationApp
 ~/IVT/examples/CalibrationApp > mkdir build
 ~/IVT/examples/CalibrationApp > cd build
 ~/IVT/examples/CalibrationApp > cmake ..
 ~/IVT/examples/CalibrationApp > ./calibrationapp
To do the actual calibration you need to use a calibration pattern and align it in various angles to the cameras. The application will take several snapshots and compute the parameter file from this.
The application produces a files called camera_armar_640x480_wide.txt which needs to be written to mca2.4/projects/armar3/robot_interface/files
To test the calibration you can use the application “HSVColorSegmentationApp”.
 ~ > cd IVT
 ~/IVT > cd examples/HSVColorSegmentationApp
 ~/IVT/examples/HSVColorSegmentationApp > mkdir build
 ~/IVT/examples/HSVColorSegmentationApp > cd build
 ~/IVT/examples/HSVColorSegmentationApp > cmake ..
 ~/IVT/examples/HSVColorSegmentationApp > ./hsvcolorsegmentationapp
The generated camera parameter file can be selected with the “Load Camera Parameter File” button.
The correct result should look something like the figure below.
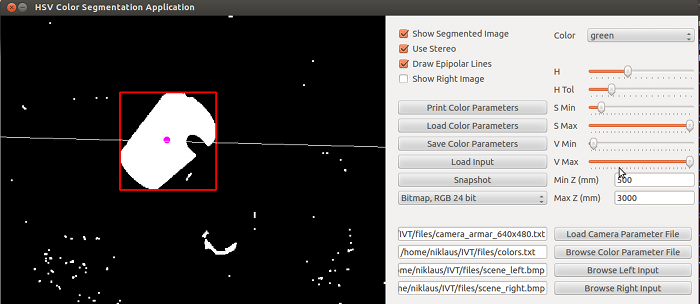
HSV Color Segmentation App
To test the quality of the calibration use the “StereoCalibrationVerificationApp” which is contained in the IVTProjects repository:
 > git clone https://i61wiki.itec.uka.de/git/ivt.projects.git IVTProjects
 > cd IVTProjects/StereoCalibrationVerificationApp
 > mkdir build
 > cd build
 > cmake ..
 > make
The StereoCalibrationVerificationApp will load a parameter file cameras.txt from the current working directory.
To test the quality of the calibration hold the calibration pattern in front of the head. The deviation will be printed as console output. The last column should aways be under “1.00”.