3 Working with the head
3.1 Starting the head
3.1.1 Hardware
First, prepare the hardware:
- Connect CAN cables to the computer
- Connect Firewire cable to the computer
- Switch head on
- Press emergency stop
3.1.2 Software
Now, prepare your software environment:
Navigate to your MCA directory and run:
~/mca2.4 > source script/mcasetenvTo set all necessary environment variables (only in the current terminal).
Now you need to start the UCOM microcontroller boards:
~/mca2.2 > startcansCheck for errors in the output, especially make sure that all UCOM boards answer. (there should be 3 boards) If errors appear run stopcans and afterwards call startcans again. Also, check the frequent errors section for the error message you received.
If all worked correctly the green LEDs on the UCOM-Boards should be blinking.
Finally you can start the head control software:
~/mca2.2 > startHead3.1.3 Initialization
Before you start RELEASE EMERGENCY STOP.
Start the command GUI:
~/mca2.4 > mcagui projects/armar3/etc/gui/HEAD_COMMAND.mcagui &Press Reset button to initialize all joints. (all joints are tested for their limits and then centered) After the procedure is finished, press the Execution Toggle button to enable scenarios to control the head.
3.1.4 Stopping
To stop the software run:
 ~/mca2.4 > stopHead
 ~/mca2.4 > stopcans
Then switch the head off and disconnect the Firewire cables to turn the cameras off.
3.1.5 Running Scenarios
Make sure you have correctly started and initialized the head as described above.
Start the Scenario MCAgui:
~/mca2.4 > mcagui ${MCA2_HOME}/projects/armar3/etc/gui/HEAD_SCENARIO.mcagui &Make sure that the status bar displays “Connected” and the status LED is blinking in green. If the MCA programs started correctly the GUI connects automatically and will not ask for user credentials
Select your scenario from the list on the right side of the GUI.
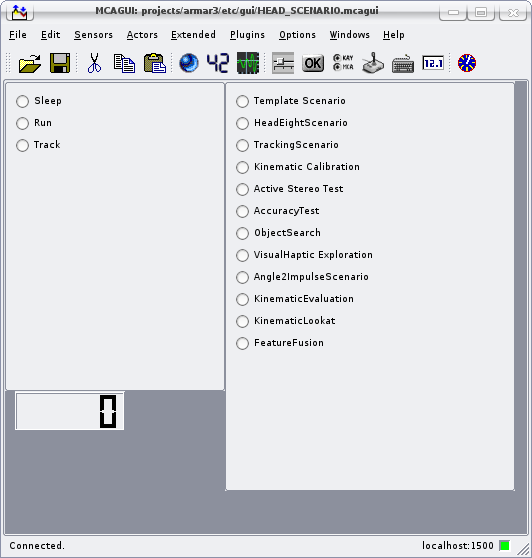
Scenario GUI
This tells the ArmarScenarioManager to load the library which is associated with the scenario ID specified in the GUI.
To run your scenario toggle the Run state on the left side of the GUI. Sleep stops your sceneario and the Track state can be used as an custom state in your scenario.
3.1.6 Deactivating scenarios
To deactivate a scenario do the following two things:
- Select the
Sleepstate from the left pane of the Scenario MCAgui - Select the
TemplateScenariofrom the right pane of the Scenario MCAgui
3.1.7 Reloading scenarios
Scenarios can be reloaded at runtime without restarting the MCA parts. This is useful if you are working on your scenario and recompile it once in a while.
To reload your scenario
- Deactivate the scenario as described above
- Start the scenario again (which will reload the shared library, that contains the scenario)
3.2 How to write your own scenario
3.2.1 Overview
Scenarios are implemented as shared libraries which are automatically loaded by the armar_control_part during startup. This avoids the need to restart armar_control_part whenever your scenario changes.
3.2.2 Implementation
The class CTemplateScenario serves as a template to create your own scenario. It can be found in the files TemplateScenario.h and TemplateScenario.cpp located in directory mca2.4/project/armar3/robot_interface/scenarios/.
If you want to create a scenario, use the CTemplateScenario header and source files as a basis.
Copy the files to a new sub directory under scenarios and rename them according to the name of your new scenario. Also, don’t forget to rename the class CTemplateScenario in your copied files.
To successfully create and destroy your scenario instances, the following functions defined in the header file need to be adapted, too:
extern "C" CScenarioInterface* createScenario(CArmarControlBase *pArmarControlBase,
    CArmarPerception *pArmarPerception) {
    return new CTemplateScenario(pArmarControlBase,pArmarPerception);
}

extern "C" void destroyScenario(CScenarioInterface *p) {
    delete ((CTemplateScenario*)p);
}

extern "C" int getScenarioID() {
    return 100;
}
The getScenarioID() function returns the ID that the mcagui uses to address your scenario. This ID must be unique across all available scenarios and a good guess is to use the creation date (yyyymmdd).
3.2.3 Adjusting the build system
After creating the source files of your scenario you also have to update the SConscript file in the directory ${MCA2_HOME}/projects/armar3/robot_interface/. The name of your scenario MUST end with the string “Scenario” (with an uppercase ‘S’!) because on startup, the scenario manager scans MCA2’s library directory for libraries matching the pattern *Scenario*.so.
The entry for CTemplateScenario looks like this:
 # template scenario
 #########################

 templateScenarioLib = MCALibrary(name = 'templateScenario')
 templateScenarioLib.AddSourceFiles("""
     scenarios/TemplateScenario.cpp
     """)

 templateScenarioLib.AddLibs("""
     mca2_kernel
     newmat
     """)

 templateScenarioLib.AddHeaderFiles("""
     scenarios/TemplateScenario.h
     """)

 mca_scenario(templateScenarioLib)
 templateScenarioLib.BuildIt()
3.2.4 Adding your scenario to the GUI
The only thing left to do, is to register your scenario in the GUI. Extend the file HEAD_SCENARIO.mcagui by following these steps:
Open mcagui:
mcagui ${MCA2_HOME}/projects/armar3/etc/gui/HEAD_SCENARIO.mcagui &in a terminal with the correctly set environment.Open the configuration dialog by doing a
<Ctrl> + <Middle Click>on the area with the scenario namesSelect the
SpecialtabIncrease the value for
No of valuesAdd the
nameof your scenario in the new field in theValue descriptioncolumnAdd the
IDof your scenario in the matching field of thevaluecolumnPress
close
3.2.5 Compiling
Make sure your have your environment variables setup correctly and the call speedscons:
 ~/mca2.4 > source script/mcasetenv
 ~/mca2.4 > speedscons
To run your scenario see the section above
3.2.6 Scenario API
All scenarios have to implement the interface CScenarioInterface (see: ScenarioInterface.h) The interface contains callback methods for several events:
NewPositionFromSound()
NewSpeechCommand()
NewHeadCommand()
They are virtual methods of the interface and need to be implemented by your scenario. Leave them empty if you don’t want to react on the events.
Each scenario has three members for accessing different parts of the head:
m_pArmarControlBase(instance ofCArmarControlBase, seeArmarControlBase.h)Access to the heads actors and internal sensors through methods of this class
m_pArmarPerception(instance ofCArmarPerceptionseeArmarPerception.h)Access to direct speech output and images
m_pScenarioHelpers(instance ofCScenarioHelpersseeScenarioHelpers.h)Provides convenience methods which are build on top of
CArmarControlBaseandCArmarPerception
3.2.7 Cameras
The cameras are initialized automatically on startup of armar_control_part provided that the vision flag has been set to yes in the config file and IVT has been installed.
Make sure that the cameras are setup and calibrated correctly.
To capture images you can use the ArmarPerception instance m_pArmarPerception that is a member of your scenario.
ArmarPerception provides two public image capture interfaces:
CVideoCaptureInterface *m_pVideoCapture;
CVideoCaptureInterface *m_pVideoCaptureFoveal;
See the documentation of CVideoCaptureInterface for more details.
ArmarPerception contains serveral image buffers of the correct image size.
// buffers have the size of foveal camera image
CByteImage *m_ppFovealImagesBig[2];
// buffers have size of peripheral camera image
CByteImage *m_ppImagesBig[2];
CByteImage *m_ppResultImagesBig[2];
CByteImage *m_ppGrayImagesBig[2];
CByteImage *m_ppTempImagesBig[2];
You can use this buffers with CaptureImage(buffer) on m_pVideoCaptrue or m_pVideoCaptrueFoveal respectively.
If you acces this buffers concurrently, you should use the provided mutexes:
CMutex *m_pMutexCapture;    // this mutex can be used to protect the captureImage method
CMutex *m_pMutexTempImage;  // protect temporary images
3.3 The Robot API
3.3.1 Overview
The robot interface encapsulates all functionality to:
control the head degrees of freedom with forward and inverse kinematics
perform coordinate system transformations
retrieve actual joint angles
The functionality can be accessed by the scenarios using the ArmarControlBase object passed to the scenario constructor and stored in the m_pArmarControlBase member variable.
The API is located in the following files (located in projects/armar3/robot_interface):
ArmarControlBase.h
ArmarControlBase.cpp
ArmarControl.h
ArmarControl.cpp
While the base class contains the basic functionality used in standalone simulation, all necessary code to communicate with the real head is located in the ArmarControl class.
3.3.2 Controlling the head
The following functions to control the head are provided by ArmarControlBase:
// move head absolute withinverse kinematics (in mm)
void MoveHeadAbsolute(float x, float y, float z, bool bMoveEyes = false);

// move head relative with inverse kinematics (in mm)
void MoveHeadRelative(float x, float y, float z);

// move head with direct kinematics (in radians)
void MoveHeadDirectKinematics(float neck_pitch_in, float neck_roll_in,
    float neck_yaw_in, float tilt_neck_tilt_in, float tilt_eyes_tilt_in,
    float eyes_right_eye_in, float eyes_left_eye_in);

// move head with direct kinematics (in degree)
void MoveHeadDirectKinematicsDegree(float neck_pitch_in, float neck_roll_in,
    float neck_yaw_in, float tilt_neck_tilt_in, float tilt_eyes_tilt_in,
    float eyes_right_eye_in, float eyes_left_eye_in);

// move eyes with inverse kinematics (in mm)
void MoveEyesAbsolute(float x, float y, float z);

// move head with given velocity using direct kinematics
void MoveHeadDirectKinematicsVel(float neck_pitch_in, float neck_roll_in,
    float neck_yaw_in, float tilt_neck_tilt_in, float tilt_eyes_tilt_in,
    float eyes_right_eye_in, float eyes_left_eye_in);
3.3.3 Retrieving sensor values
The following members of ArmarControlBase allow to retrieve the actual joint values and velocities.
// current position of head joints
float neck_pitch_actual,
      neck_roll_actual,
      neck_yaw_actual,
      neck_tilt_actual,
      head_eyes_tilt_actual,
      head_left_eye_pan_actual,
      head_right_eye_pan_actual;

// current velocities of head joints
float neck_pitch_actual_vel,
      neck_roll_actual_vel,
      neck_yaw_actual_vel,
      neck_tilt_actual_vel,
      head_eyes_tilt_actual_vel,
      head_left_eye_pan_actual_vel,
      head_right_eye_pan_actual_vel;
3.3.4 Coordinate transformations
The following functions perform coordinate transformations between the different coordinate systems of the head.
void LeftCameraToCameras(float x_left, float y_left, float z_left,
    float &x_cameras, float &y_cameras, float &z_cameras);

void CamerasToHead(float x_cameras, float y_cameras, float z_cameras,
    float &x_head, float &y_head, float &z_head);

void CamerasToLeftCamera(float x_cameras, float y_cameras, float z_cameras,
    float &x_left, float &y_left, float &z_left);

void CamerasToRightCamera(float x_cameras, float y_cameras, float z_cameras,
    float &x_right, float &y_right, float &z_right);

void HeadToCameras(float x_head, float y_head, float z_head,
    float &x_cameras, float &y_cameras, float &z_cameras);

void LeftCameraToHead(float x_left, float y_left, float z_left,
    float &x_head, float &y_head, float &z_head);

void HeadToLeftCamera(float x_head, float y_head, float z_head,
    float &x_left, float &y_left, float &z_left);
3.3.5 Coordinate Systems
The ARMAR uses different coordinate system for each component. The relevant coordinate system for the head are:
- left camera
- right camera
- cameras (centered)
- head
An overview of the coordinate systems of the head is given in this pdf.
3.4 Configure maximum angles
Per default the maxium angles of the DOF are software limited to the following values:
| DOF | Min | Max |
|---|---|---|
| Neck Pitch | -33 | 33 |
| Neck Roll | -28 | 28 |
| Neck Yaw | -114 | 114 |
| Head Tilt | -40 | 40 |
| Eyes Tilt | -20 | 20 |
| Left Eye | -20 | 20 |
| Right Eye | -20 | 20 |
You can change this values to suite your application, but be careful.
The file to configure this is located at project/armar3/action/control/etc/Head.AttributeTree.